
Critically, the best aperture for landscape photography is the one that provides enough depth of field to ensure your whole scene, from foreground to background, is in focus. Therefore, you often need to use smaller apertures such as F8 and F11. However, reliance on smaller apertures may cause you problems.
For instance, smaller, dimmer apertures demand slower shake-prone shutter speeds or high image-degrading ISOs. And if your aperture is too small, your image will lose sharpness thanks to diffraction. So here are 4 tips you can use to find the right aperture for your landscape.
1. Choosing the right aperture for depth of field
Typically, but not always, landscape photographers are seeking a sharp, in-focus image from foreground to background.
For example, you may be photographing a scene featuring a foreground 3 meters from your camera and a background extending out to the horizon. And in this case, the best aperture for this landscape photo is the one that renders a sharp image from 3 meters to infinity. Read about depth of field
Happily, this can be calculated to determine what is known as hyper-focal distance. With your lens focused to infinity, hyper-focal distance is the distance from which everything appears sharp. Read about Hyperfocal Distance
For instance, if you are using a Nikon D3500 with your kit lens set to 18mm, setting your aperture to F8 ensures everything from 2.5 meters onwards will appear sharp.
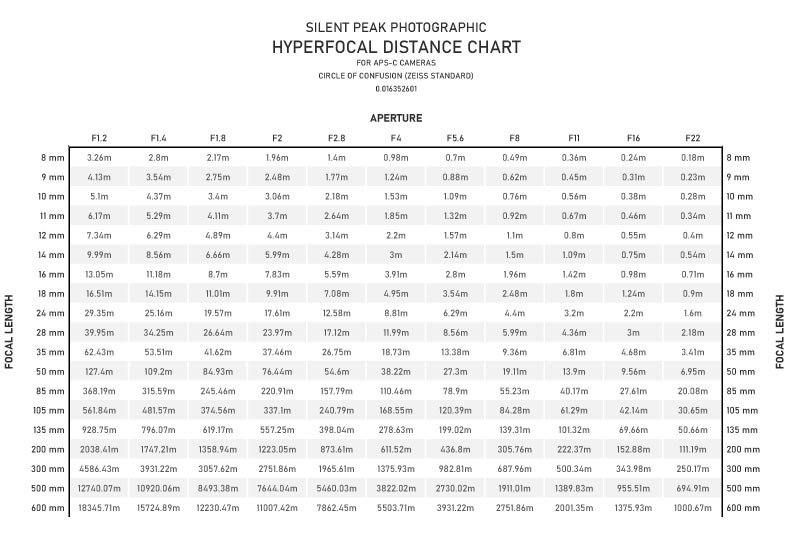
The easiest way to determine your hyperfocal distance is to use an app such as Hyperfocal Pro. You can also download one of my free cheat sheets.
Alternatively, there’s always trial and error. First, set your lens to infinity by focusing on a distant object. Then, set your aperture to F8, compose your photo, and take a test shot.
If both your foreground and background appear sharp, you know F8 is sufficient, and you may be able to try a larger aperture such as F5.6.
On the other hand, if your photo is not sharp, repeat the process with a smaller aperture until you get a sharp photo. Read tips for sharper photos

2. Use your brightest possible aperture
Having read tip number 1, you may be tempted to dial in your smallest possible aperture for the sake of deep depth of field. However, this would be a mistake.
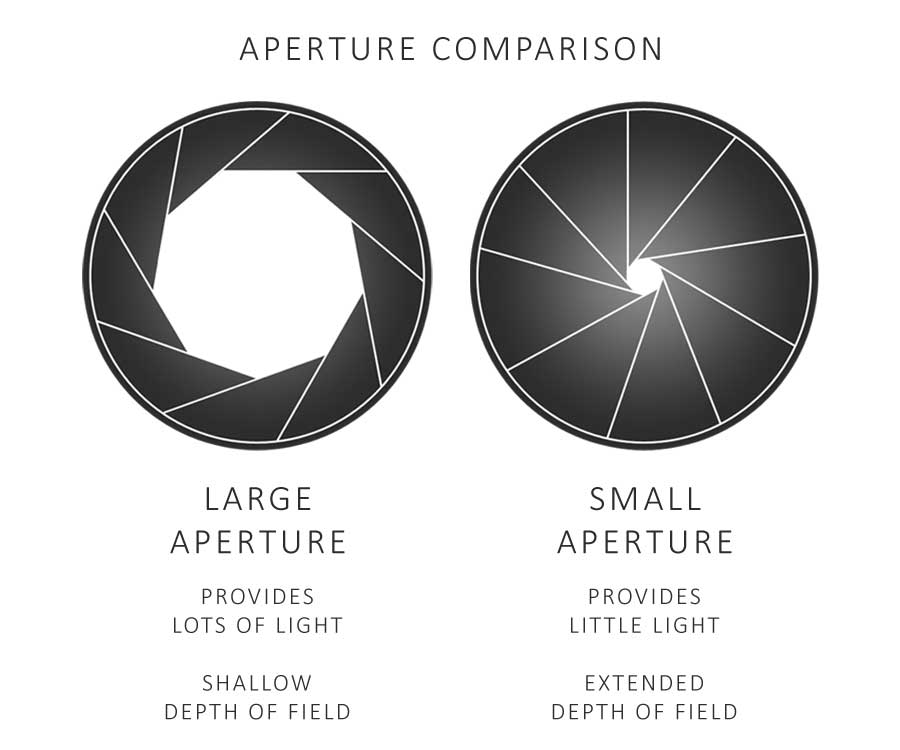
As you shrink your aperture, you decrease the amount of light passing through your lens. In fact, your camera receives 8 times more light at F4 than it does at F11. Read more about Aperture.
Thus, to compensate, you must use an 8 times-slower shutter speed and risk your photo being blurred by camera shake. Read more about Shutter Speed.
Alternatively, you can keep a fast shake-free shutter speed by dialing up your ISO. Yet doing so will degrade your photo’s image quality. Read more about ISO.
However, if your scene is still and features no moving objects, you can get around this problem by placing your camera on a steady surface such as a tripod. Doing so enables you to use long, light-soaked shutter speeds without camera shake induced blur. Read how to avoid camera shake with the reciprocal rule.
Nevertheless, there are other reasons why you should use larger apertures.

3. Diffraction
As your aperture shrinks, it begins to interfere and reroute the light passing through your lens. As a result, the light becomes increasingly scattered and your photo increasingly blurred.
Although diffraction occurs, to some extent, at all apertures, its severity grows to noticeable levels at F11 and beyond. However, a little diffraction is much more tolerable than an out-of-focus photo. Therefore, if you must use a diffraction-inducing aperture to get sufficient depth-of-field, you should.
4. Use your lens sweet spot.
If you have determined a large aperture such as F4 is giving you sufficient depth-of-field, it may be worth using a smaller aperture since most lenses have a sweet spot.
Although it varies, lenses often perform best around F5.6. Hence, if you can take your shot using your lens’s optimal aperture, you should.
Conclusion
First and foremost, the best aperture for landscape photography is one that provides enough depth-of-field that both your foreground and background appear sharp.
Your second priority is to maximize the amount of light your camera receives. Thus, you should use an aperture no smaller and dimmer than necessary. Therefore, if F8 gives you sufficient depth of field, don’t use F11.
Furthermore, the smaller your aperture, the more diffraction will occur, and the more blurred your photo will appear. Although you should always prioritize depth-of-field, diffraction is another reason not to use smaller apertures than necessary.
In fact, the only reason you may want to shrink your aperture beyond your depth-of-field requirement is if it gets you closer to your lens sweet-spot. All lenses have an optimal aperture where they deliver peak contrast and sharpness. Therefore, it may be worth surrendering a little light to get the very best out of your optics.